- Knowledge Base
- Assets
- Introduction
- How to create a new asset
- How to add a run
- How to edit a run
- How to mark a run as complete
- How to archive a run
- How to delete a run
- How to change the assignee
- How to add a result in a checklist run
- How to add bulk results in a checklist run
- How to share run tasks with external participants
- How to generate an Excel or PDF report from a checklist run
- How to filter the run tasks view
- What is an office asset
- How to create a new asset
- How to manage an asset
- How to move an asset
- How to dispose of an asset
- How to transfer (in) an asset
- How to transfer (out) an asset
- How to log a sighting of an asset
- How to log an inspection of an asset
- How to log maintenance on an asset
- How to export a record of an asset
- How to print asset labels
- Introduction
- Admissions
- Assets
- Bank Accounts
- Boards
- Business Trips
- Candidates
- Checklists
- Clients
- Companies
- Consents
- Contacts
- Contracts
- Custom Forms
- Departments
- Documents
- Evaluations
- Employee Performance
- GL Accounts
- Incoming Center
- Integrations/External Systems
- Invoices
- Job Management
- Key Dates
- Months
- Offices
- Personnel
- Polls
- Project Management
- Project Status
- Purchase Orders
- Schedule
- Shared Spaces
- Teams
- Time Off
- Time Tracking
- Transactions
- Vendors
- Mobile Application
- What is a personnel asset
- How to create a new asset
- How to manage an asset
- How to move an asset
- How to log inspection on an asset
- How to log maintenance on an asset
- How to dispose of an asset
- How to transfer (out) an asset
- How to transfer (in) an asset
- How to log a sighting on an asset
- How to print asset labels
- How to export a record of an asset
- What is a project asset
- How to create a new asset
- How to manage an asset
- How to move an asset
- How to log inspection on an asset
- How to log maintenance on an asset
- How to dispose of an asset
- How to transfer (out) an asset
- How to transfer (in) an asset
- How to log a sighting of an asset
- How to print asset labels
- How to export a record of an asset
- Project transactions
- How to record an estimate
- How to create a budget
- How to submit transaction items for approval
- How to approve or deny budgeting items from the transactions grid
- How to create a purchase order from approved estimates
- How to link approved estimates to approved budgets
- How to cancel a transaction
- How to deactivate a transaction
- How to edit a transaction
- How to re-submit a denied transaction
How to create a new asset
You can use Vault Synapse to store all the information regarding your company assets in one place. It's easy to access from anywhere at any time.
Handle all information regarding your assets in one place and minimize administrative effort. Get an overview of the asset model, serial number, owner, warranty, purchase date, location and much more. You can easily track the complete life cycle of every asset in your company and react quickly if any repairs are needed.
To create a new asset, go to the Assets module and click on the Assets tab.
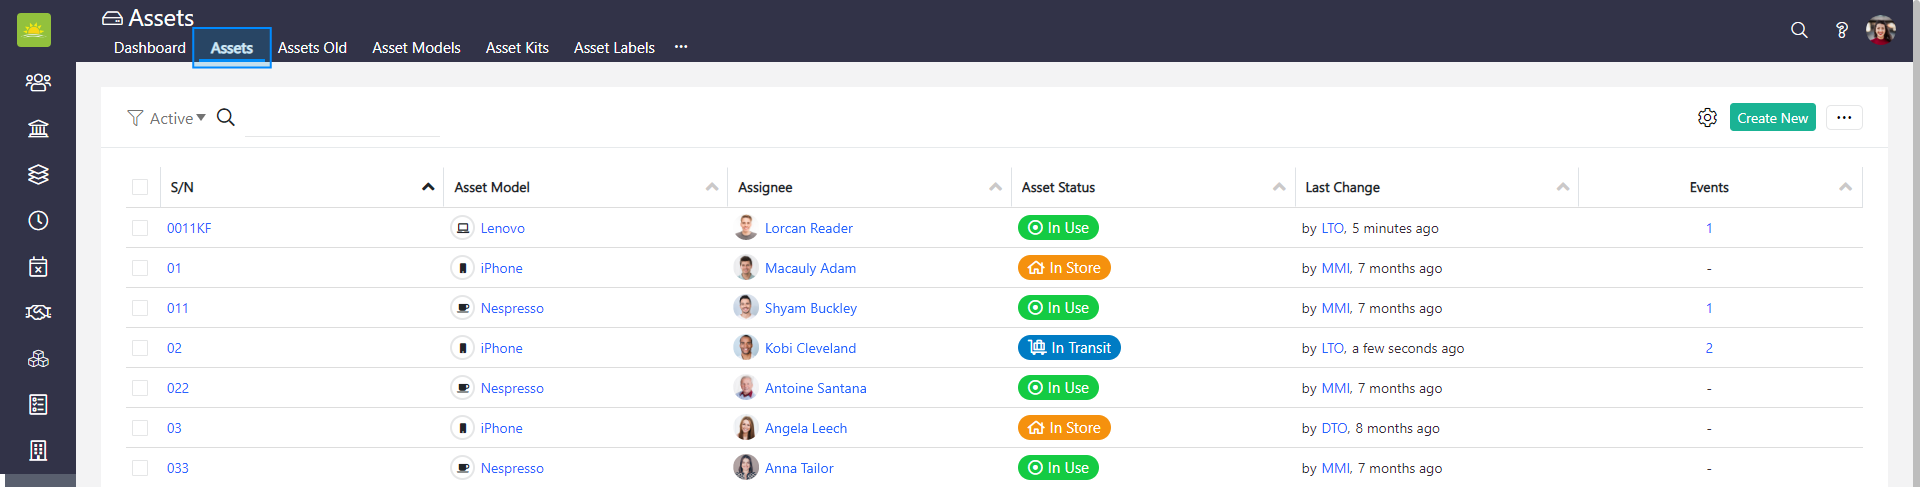
Click on Create New in the top right corner.

Note! Another option is to go to the Dashboard tab and create a new asset from there. Click on Add New Asset to open the Add New Asset modal window pictured below.
An Add New Assets modal window will pop up.
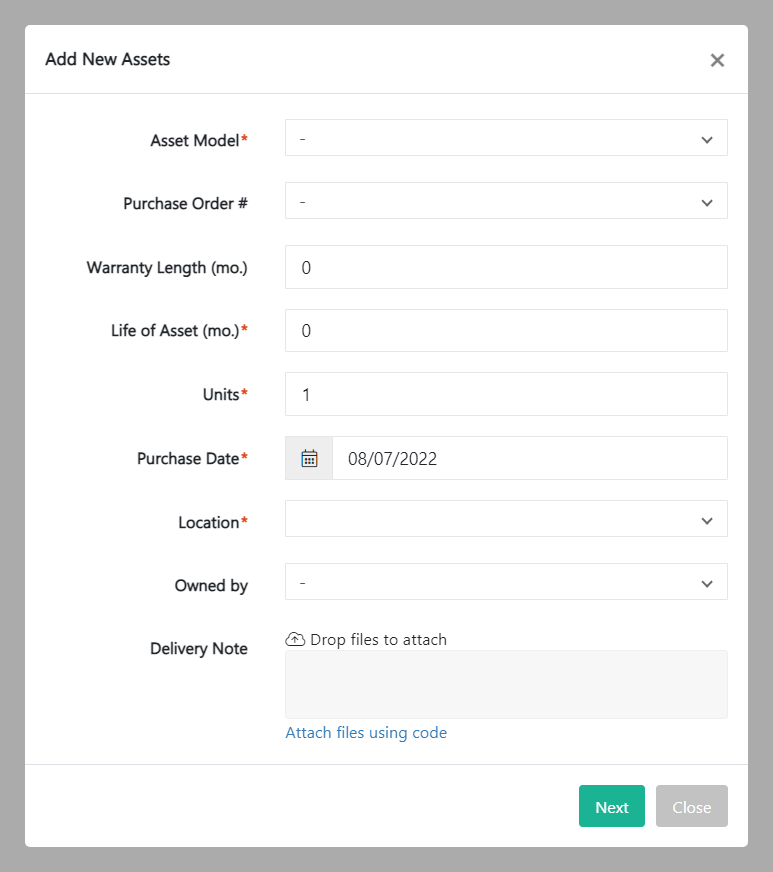
Fill out the following fields about the new asset:
- Asset Model – Which type of asset it is classified as. Asset models can be defined in the Asset Models tab.
- Purchase Order # – The number of the purchase order. Purchase orders can be defined in the Purchase Orders module.
- Warranty Length (months) – The length of the warranty on the asset. This is valued in months.
- Life of Asset (months) – The length of the total life of the asset. This is valued in months.
- Units – You can create multiple assets from the same model in one creation event.
- Purchase date – The date on which the asset was purchased.
- Location – The last known location of the asset.
- Owned by – The name of the personnel, company, project, or office that owns the asset.
- Delivery Note – A document that accompanies the delivery of the asset, typically containing the name of the product and the quantity of the units present.
Once you have entered the data, click Next and it will take you to a new modal window.
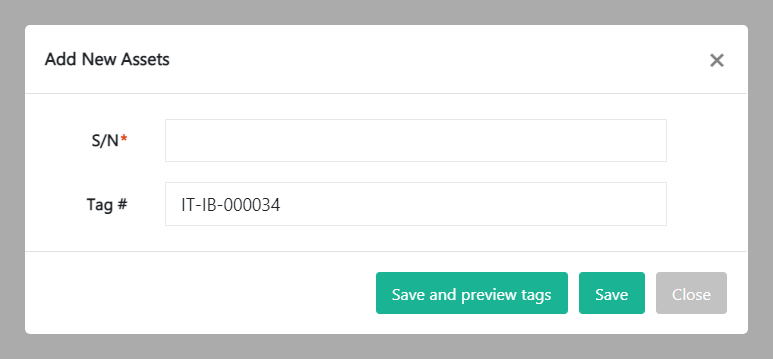
Fill out the following fields about the new asset:
- S/N – The serial number of the asset.
- Tag # – The tag number of the asset. This allows it to be found more easily when attempting to locate it in the future.
Click on Save to update the status of the selected asset.
Note! Vault Synapse is a highly customizable tool, meaning certain parts and functionalities of the application can be additionally built-in or customized based on your business needs and preferences.
Note! A user can access the asset information only with the relevant permissions/access rights given by the administrator.
Was this article helpful?
Didn’t find what you were looking for?
Contact us and we’ll build the right solution for you. Vault Synapse can be fully customized based on your business needs.