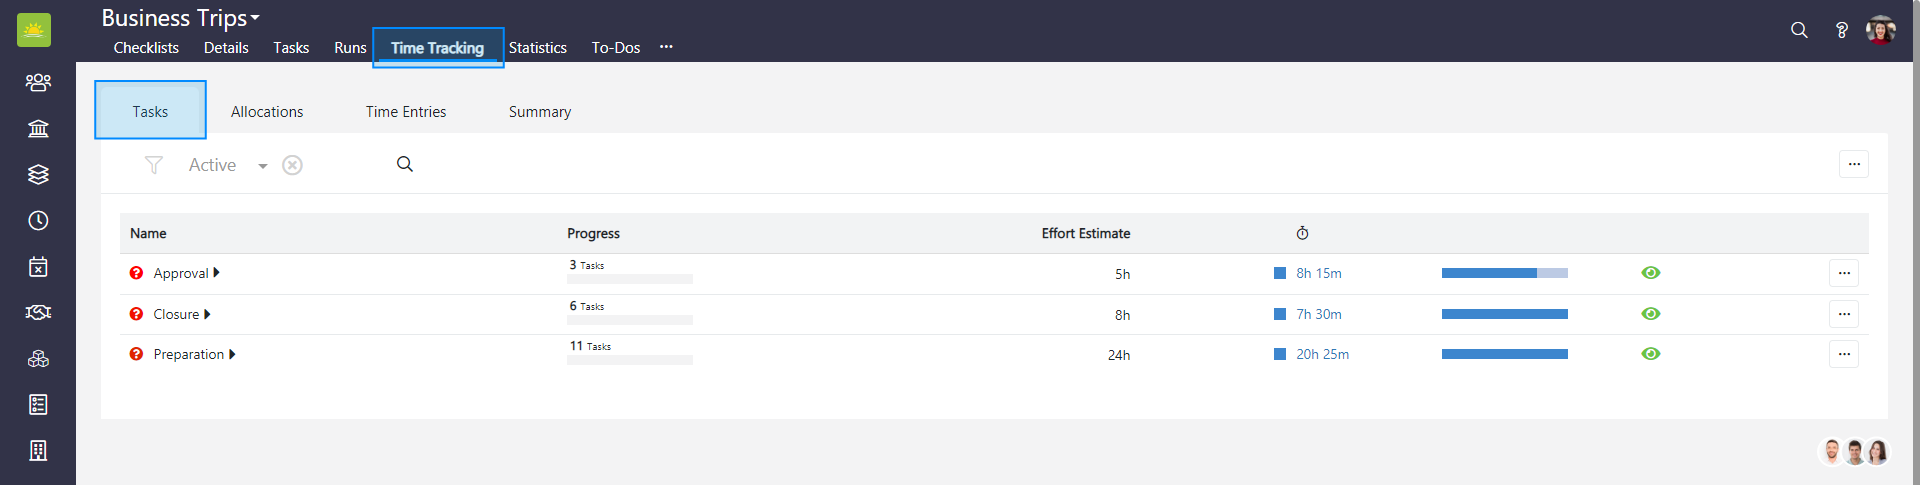
Tasks
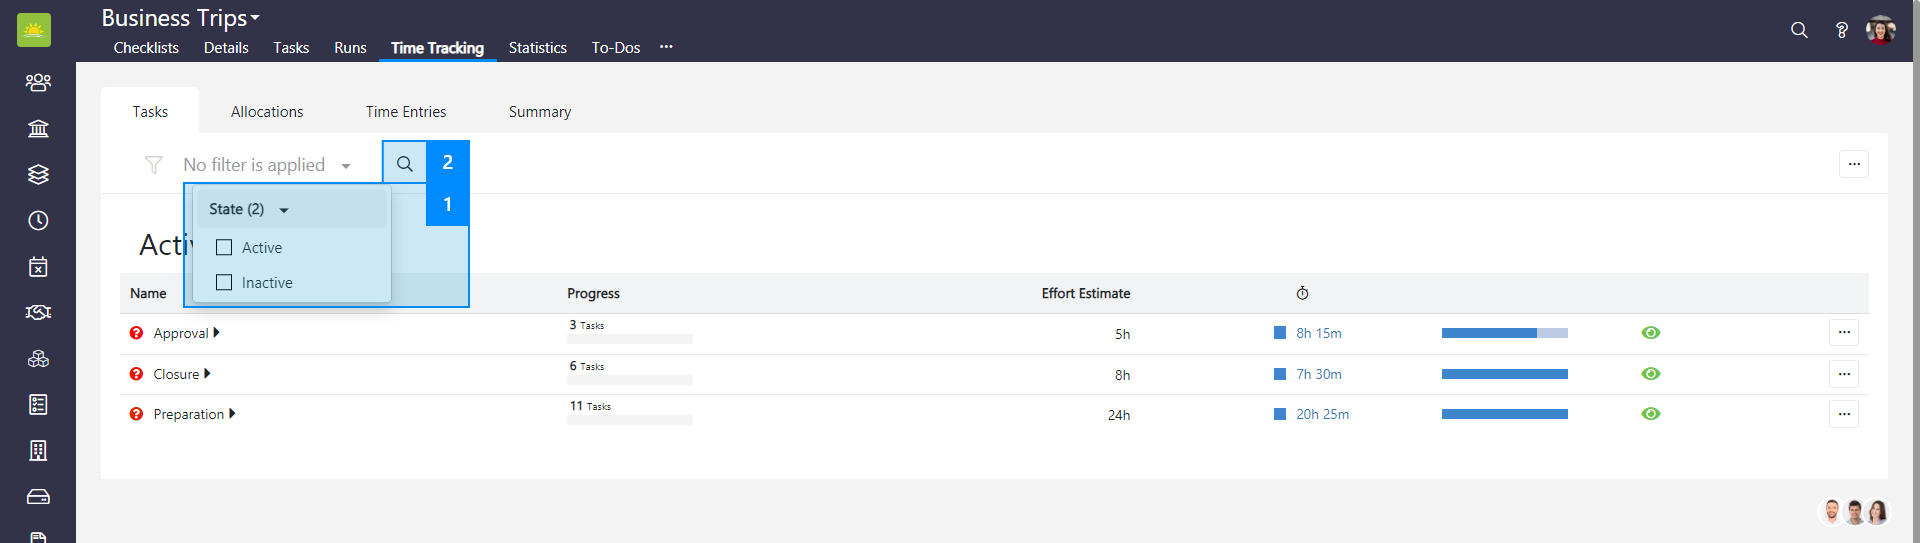
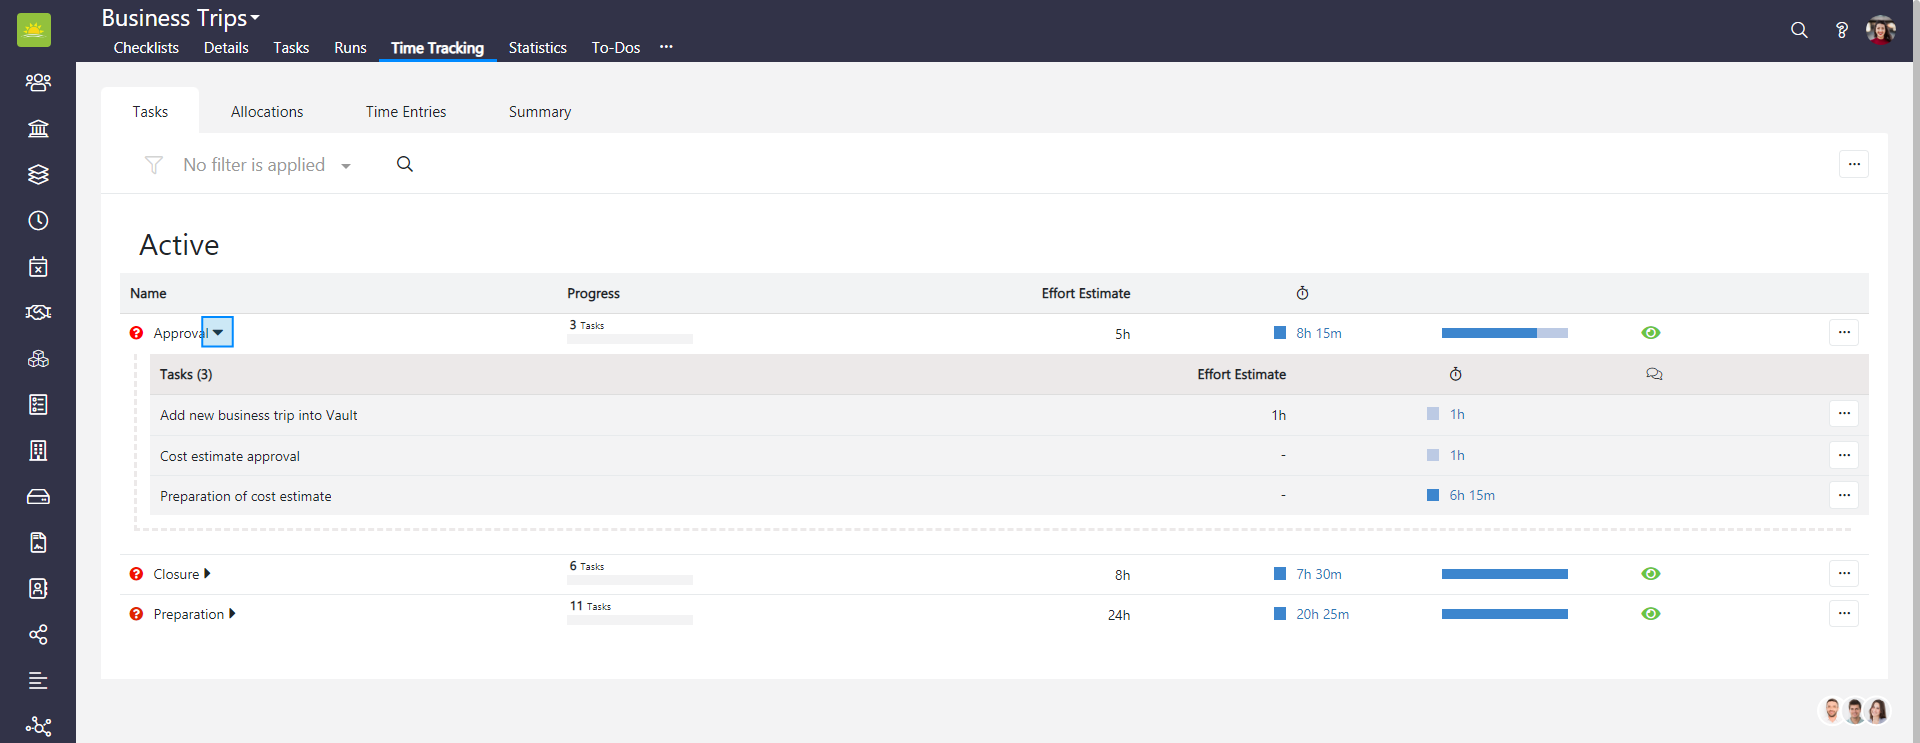
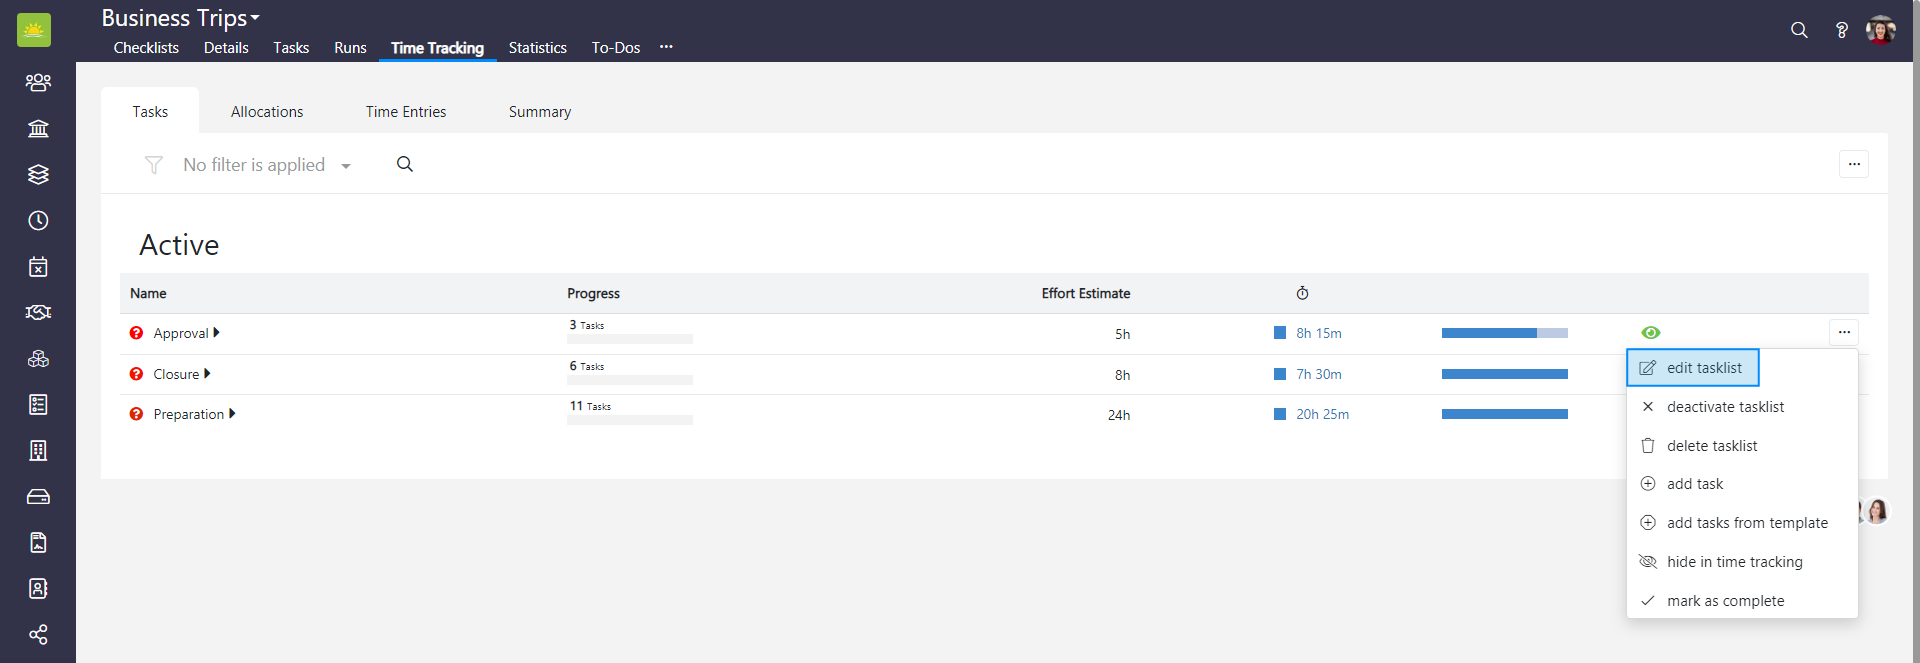
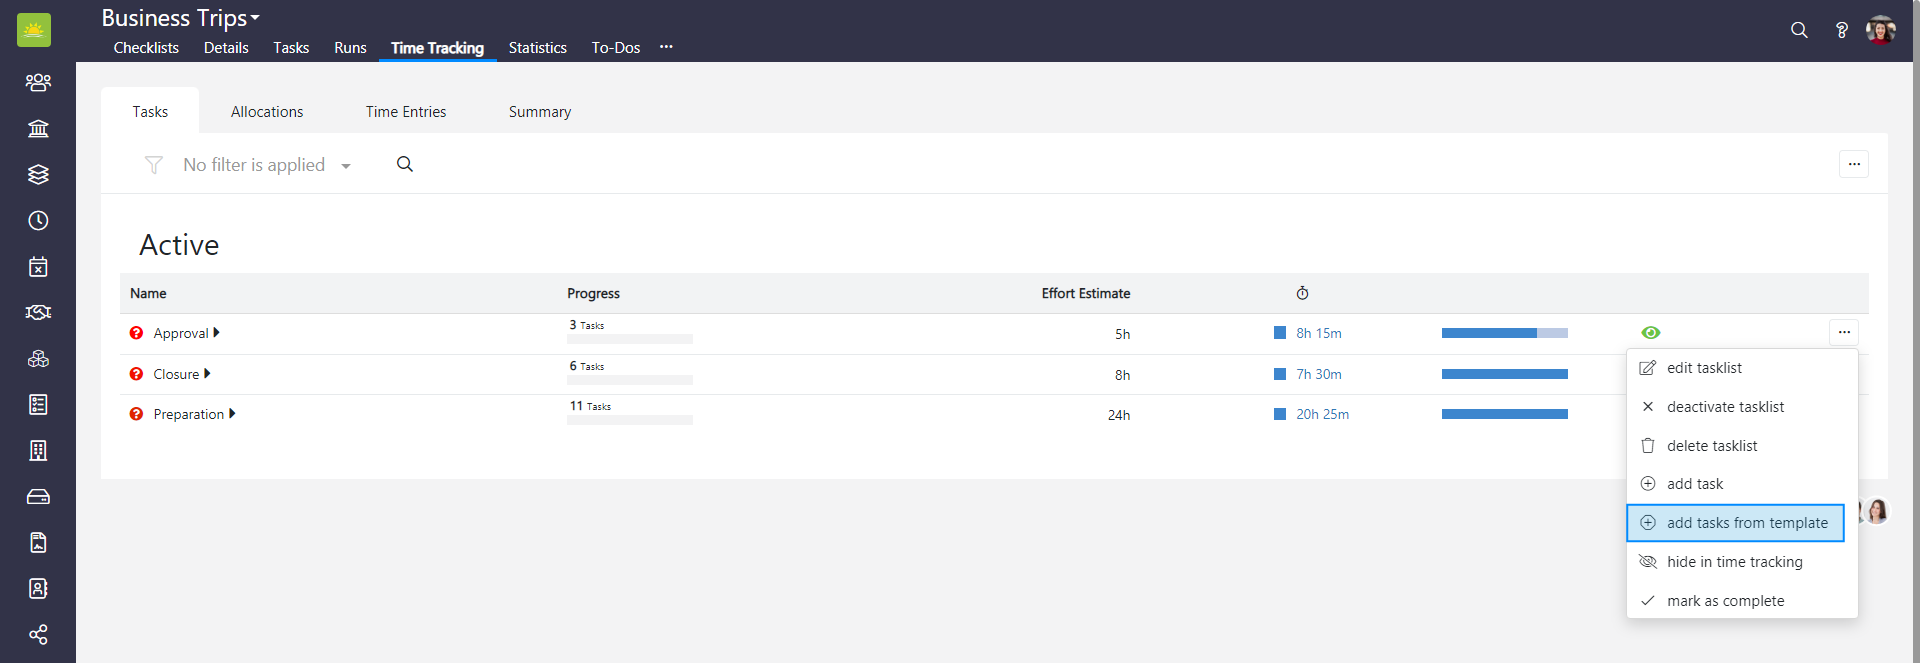
On the Tasks page, you can view a list of Active and Completed tasklists, their Progress, Due Date, and Effort Estimate. The column under the clock icon displays the hours worked in total on all tasks which are part of a specific task list. The dark square icon next to the number of hours indicates billable hours.
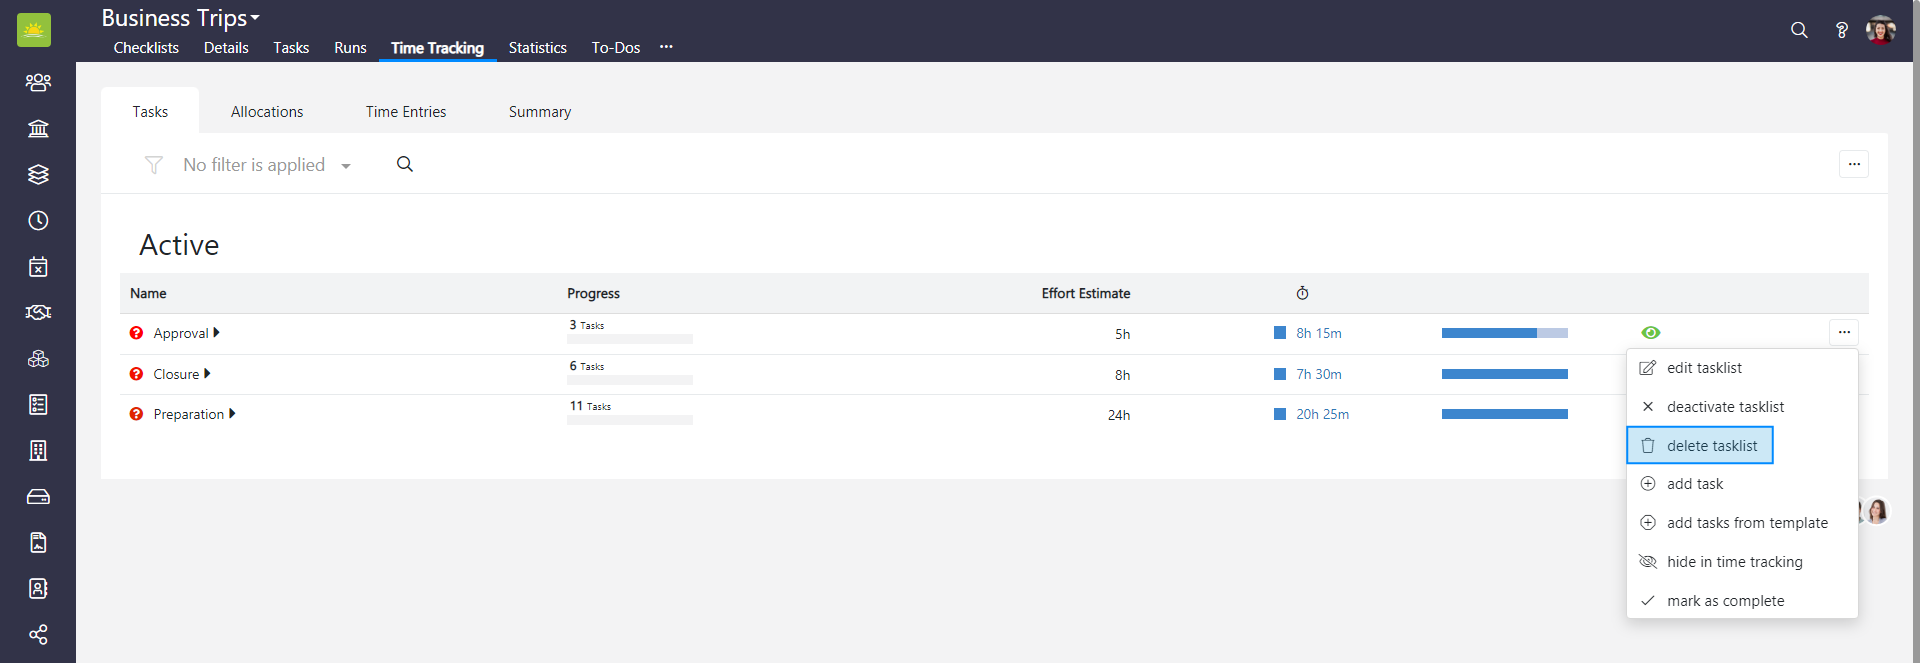
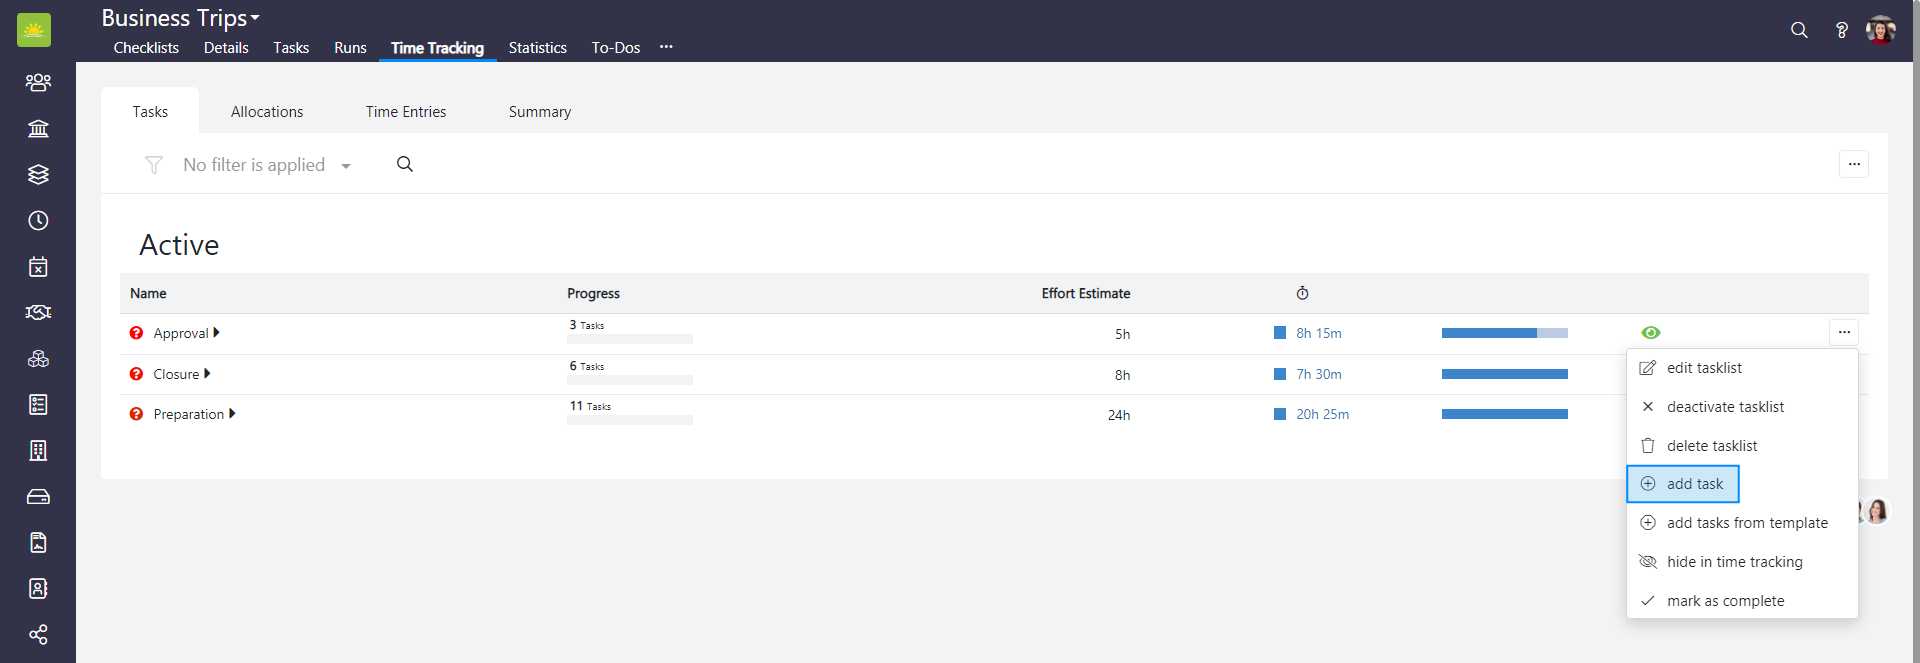
A light blue square icon indicates the non-billable number of hours. The eye icon tells you whether the tasklist is visible in time tracking or not. At the end of each item’s row, you can find … which allows you to edit a tasklist, activate/deactivate a tasklist, delete a tasklist, add a task, add tasks from a template, show/hide in time tracking, and mark as complete/incomplete.
To view all tasks for the entire Checklists module, go to the Checklists module and click the Time Tracking tab. If you want to view tasks for a specific checklist, go inside the checklist and click the Time Tracking tab from there, then click the Tasks tab.
From the Tasks tab you can add, edit, activate/deactivate, or delete checklist tasks and tasklists. Tasklists can also be marked as complete/incomplete from here or hidden/shown in time tracking.

You can filter the view by active and inactive tasklists, or both. Start typing the name of the tasklist into the search field to quickly find the entry.
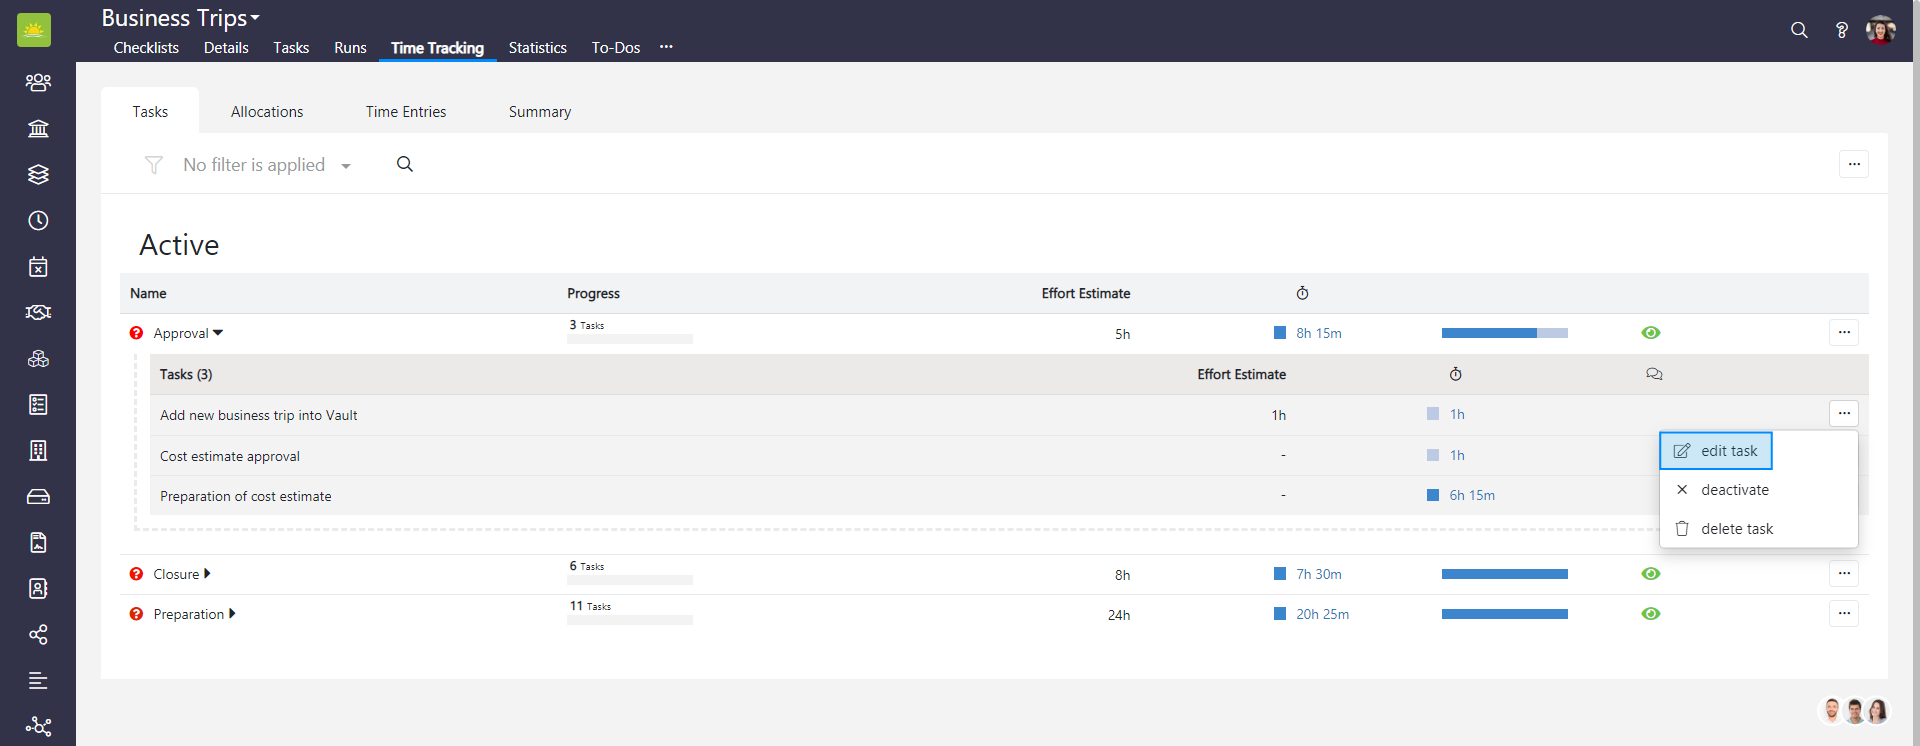
Expand a tasklist to view individual tasks, their effort estimates and how much time has been spent on them. You can view the tasks assignees, whether the tasks are visible in time tracking, view comments and you can also edit, deactivate or delete tasks from here.
How to add a new tasklist
To add a new tasklist to the entire Checklists module, go to the Checklists module and click the Time Tracking tab. If you want to add a new tasklist to a specific checklist, go inside the checklist and click the Time Tracking tab from there, then click the Tasks tab.

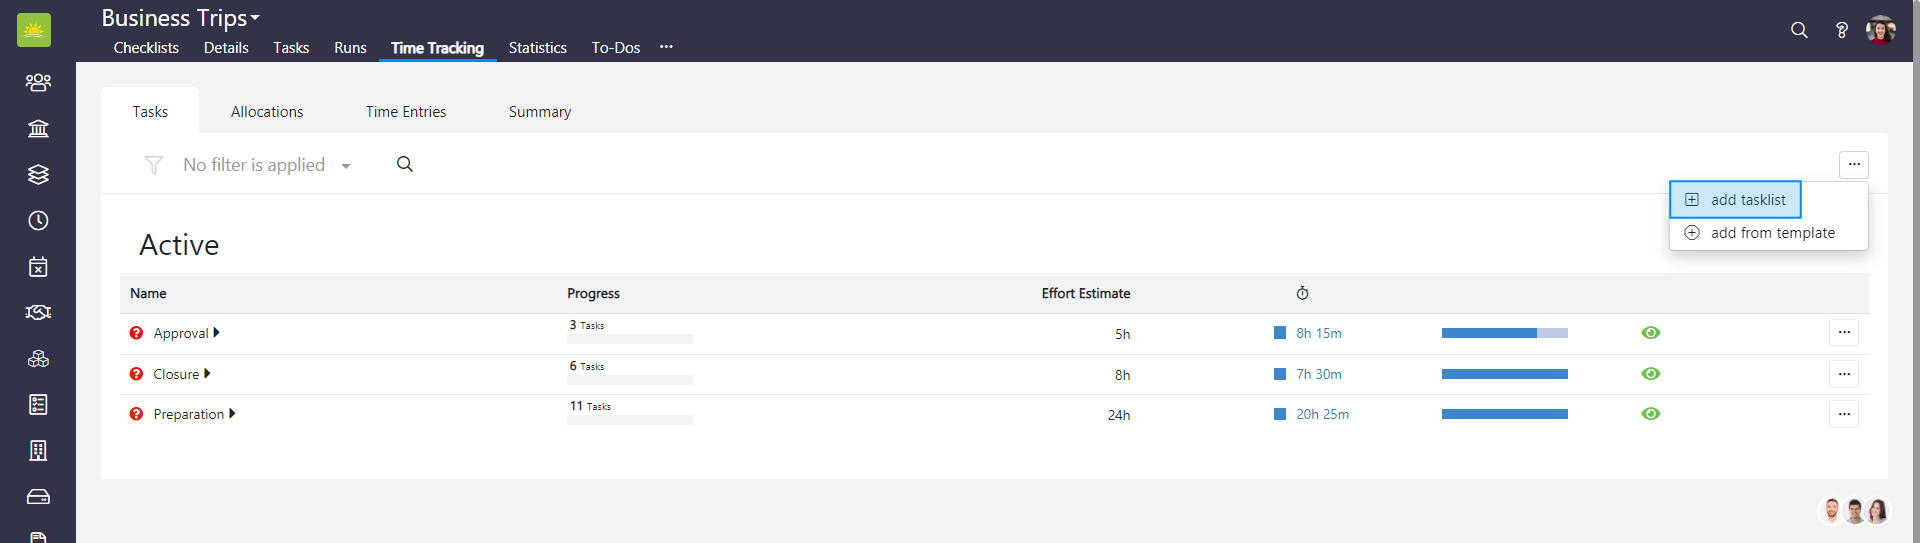
Click ... in the top right corner and then click add tasklist.
A modal Add New Tasklist window will pop up.
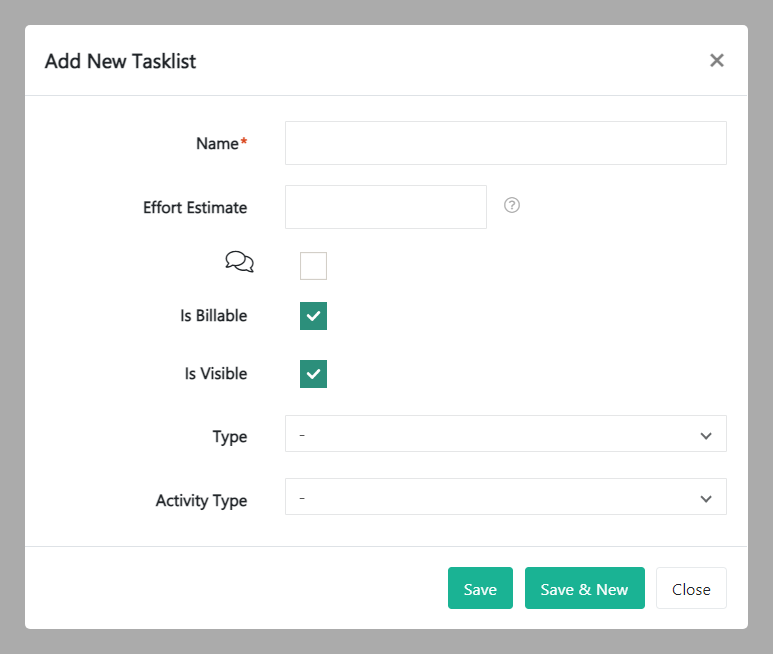
Fill out the fields for the new tasklist:
- Name – Give the tasklist a name.
- Effort Estimate – Estimate the time needed to complete this tasklist.
- Comment – Tick this checkbox to make comments mandatory.
- Is Billable – This box is checked by default. Untick if the work on this tasklist is not invoiced to the client.
- Is Visible – This box is checked by default. Untick if you want this tasklist to be invisible in time tracking for the end user. The tasklist still remains visible in tasklist.
- Type – Select the tasklist type from the dropdown menu. Tasklist types can be defined in the Organization Configuration by an administrator.
- Activity Type – Select the activity type from the dropdown menu. You can choose Administration, Non-productive Time, Production/Services, Sales, Support, and Uncategorized.
Review the information and click Save.
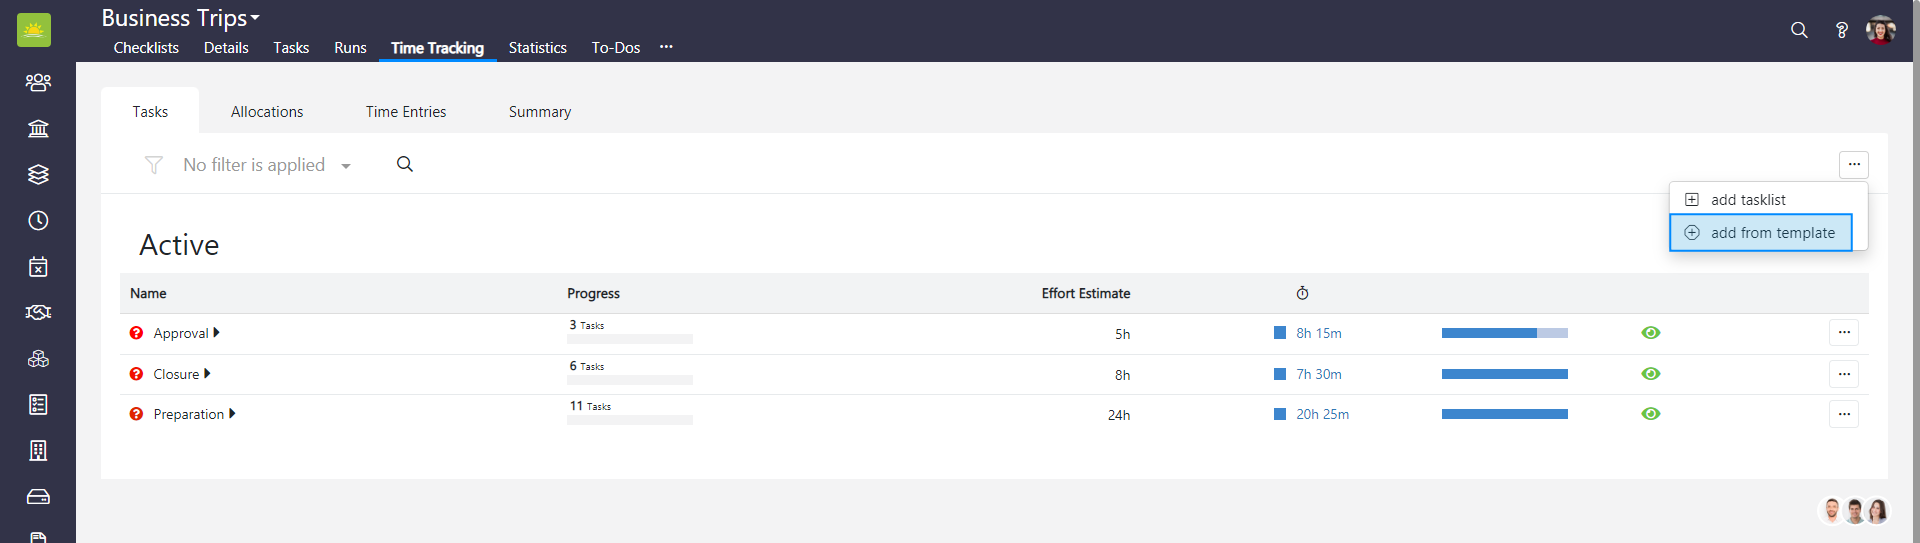
How to add a tasklist from a template
To add a tasklist from a template to the entire Checklists module, go to the Checklists module and click the Time Tracking tab. If you want to add a tasklist from a template to a specific checklist, go inside the checklist and click the Time Tracking tab from there, then click the Tasks tab.
Click ... in the top right corner and then click add from template.
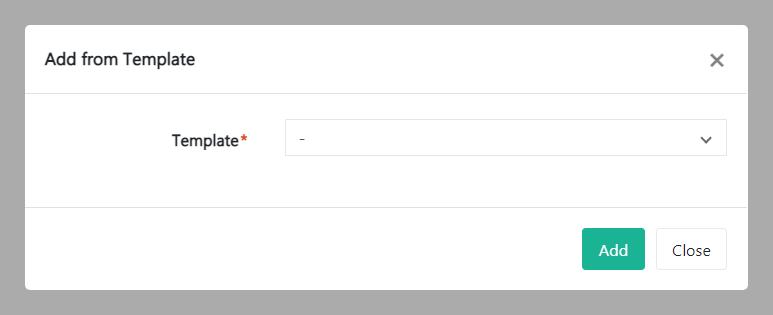
Select a template from the dropdown menu and click Add. Tasklist templates are created and defined in the Organization Configuration by an administrator.
Select the items to add to time tracking in the checklist.
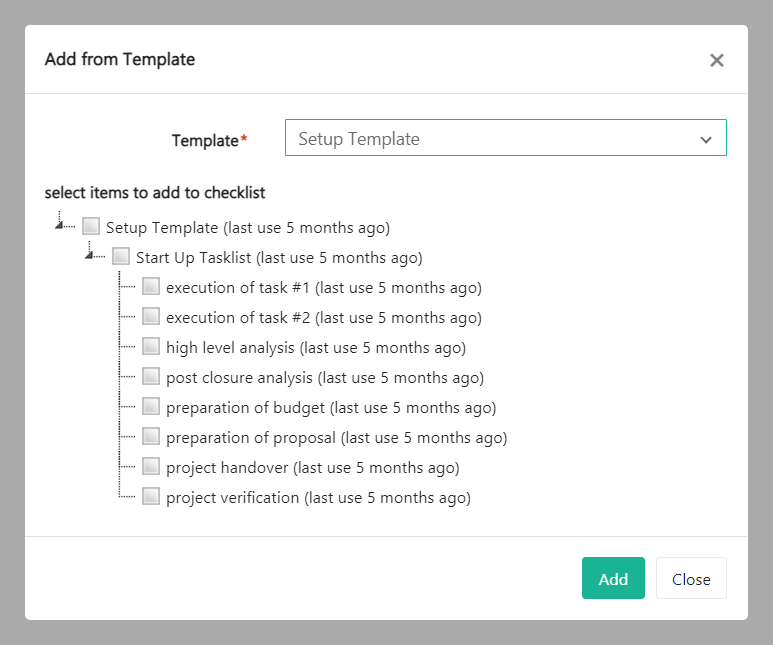
Review the information and press Add.
How to edit a tasklist
To edit a tasklist in the entire Checklists module, go to the Checklists module and click the Time Tracking tab. If you want to edit a tasklist in a specific checklist, go inside the checklist and click the Time Tracking tab from there, then click the Tasks tab.

Find the tasklist you wish to edit. Click ... at the end of the selected tasklist row and select edit tasklist.
A modal Edit Tasklist window will pop up.
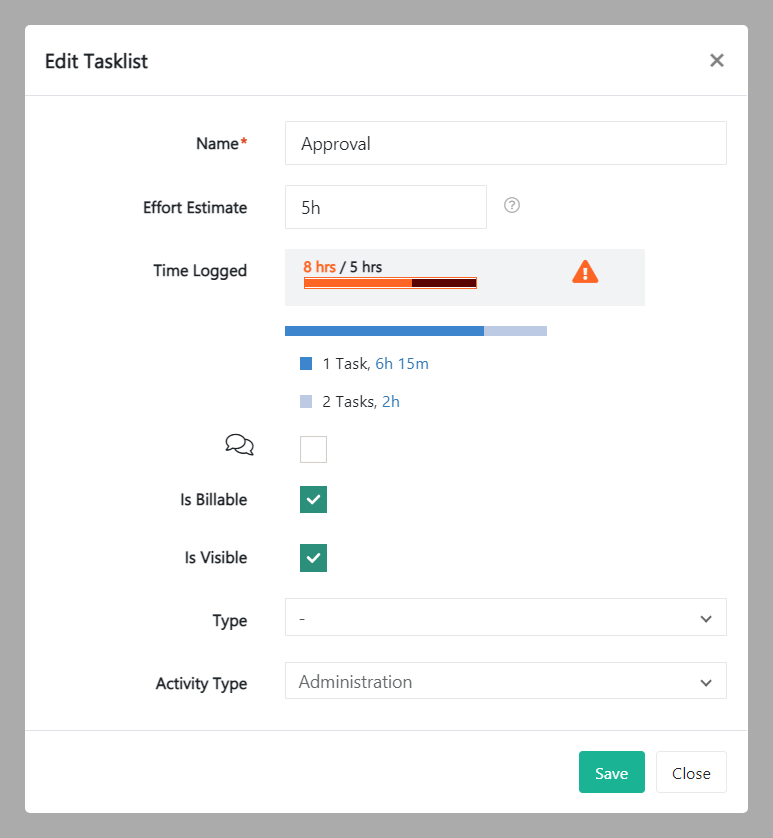
Update the relevant information and click Save. Click Close to return to the tasklists screen.
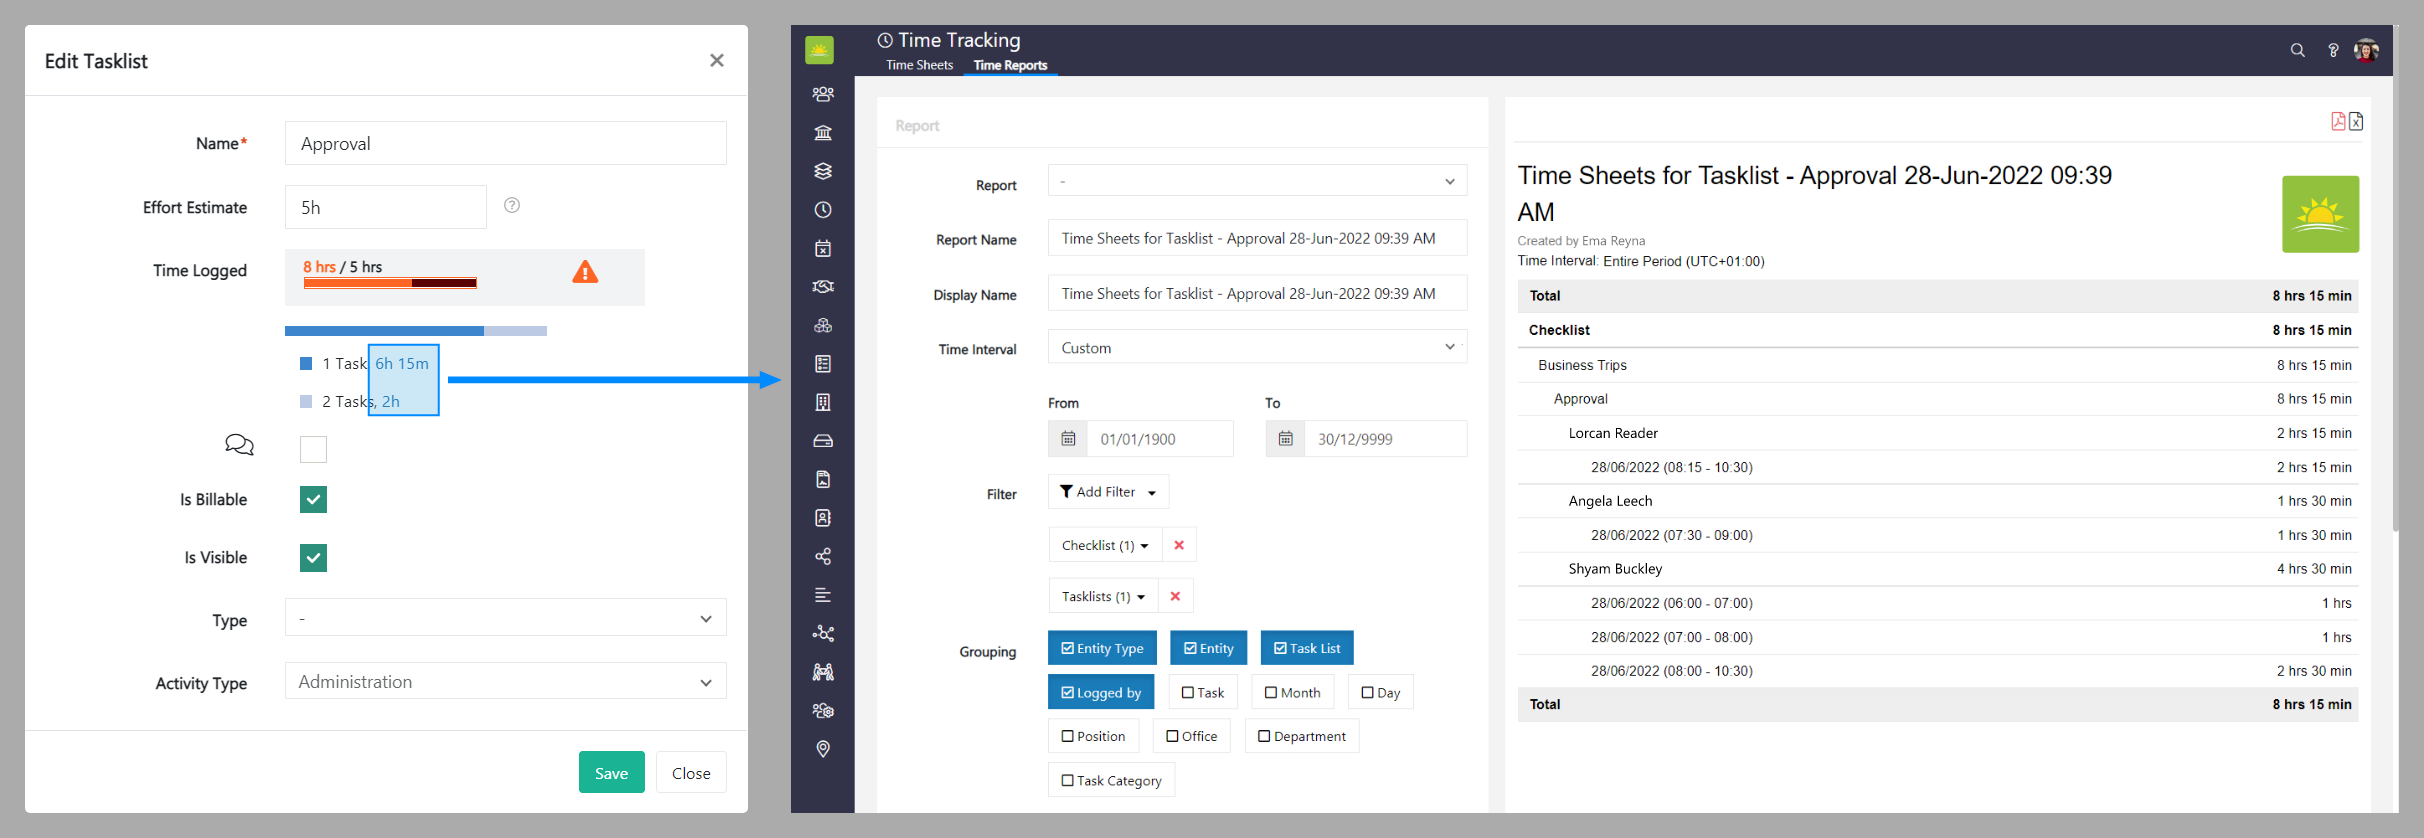
Click on the Time Logged to generate a time report. To learn how to generate time reports, follow the link ...
How to deactivate a tasklist
To deactivate a tasklist in the entire Checklists module, go to the Checklists module and click the Time Tracking tab. If you want to deactivate a tasklist in a specific checklist, go inside the checklist and click the Time Tracking tab from there, then click the Tasks tab.

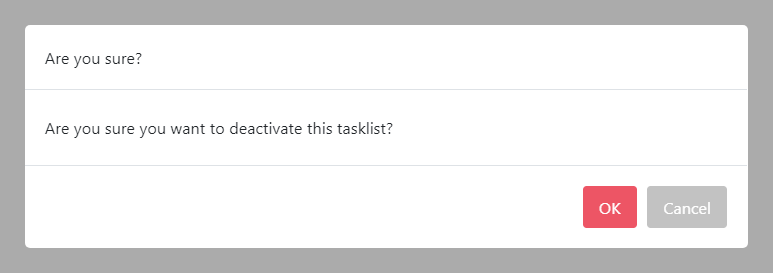
Find the tasklist you wish to deactivate. Click ... at the end of the tasklist row and select deactivate tasklist.
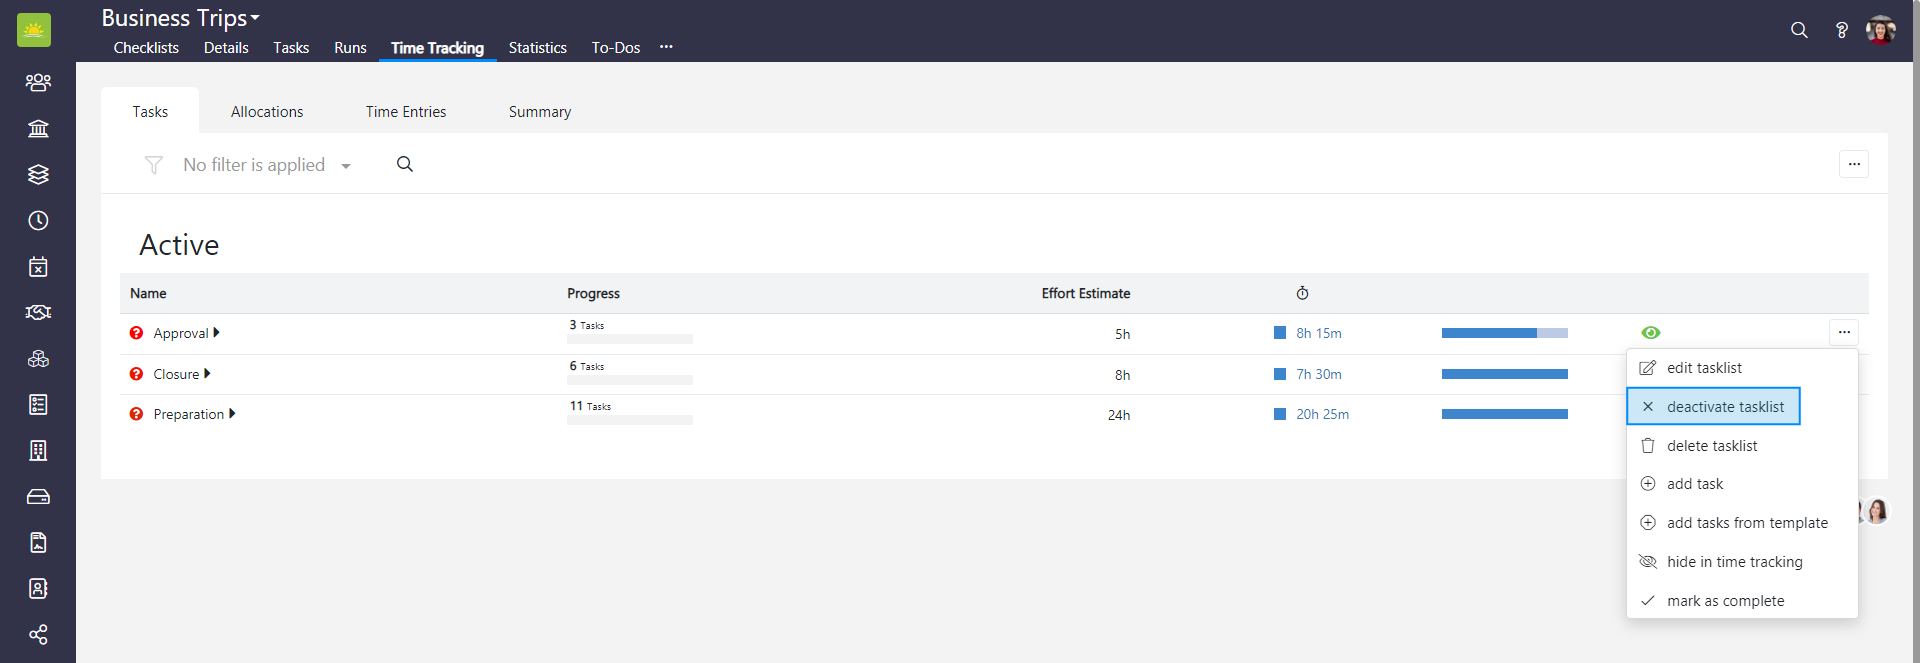
To minimize the risk of accidental deactivation, you must confirm your intention to deactivate the tasklist. Click OK and the tasklist will be deactivated.
You will still be able to view deactivated tasklists by filtering the view by state (inactive).
How to delete a tasklist
To delete a tasklist from the entire Checklists module, go to the Checklists module and click the Time Tracking tab. If you want to delete a tasklist from a specific checklist, go inside the checklist and click the Time Tracking tab from there, then click the Tasks tab.

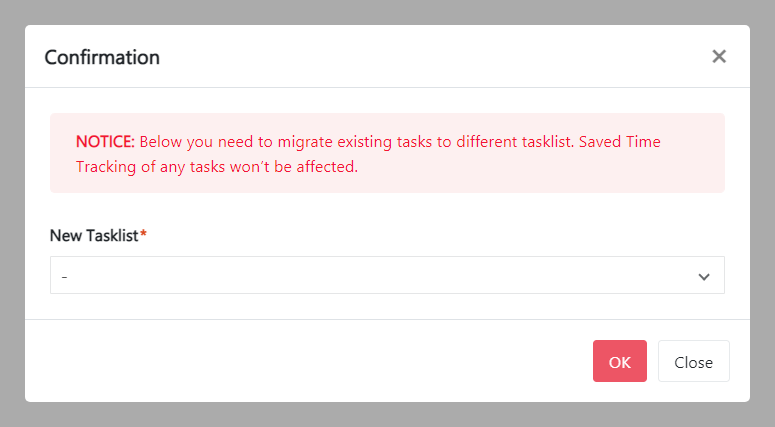
Find the tasklist you wish to delete. Click ... at the end of the tasklist row and select delete tasklist.
A tasklist is synced with other data that you do not want to lose, so you must select a different tasklist from the dropdown list where the existing tasks will be migrated to. After adding the tasks to a new Tasklist, click OK to delete the tasklist.
How to add a task
To add a task to the entire Checklists module, go to the Checklists module and click the Time Tracking tab. If you want to add a task to a specific checklist, go inside the checklist and click the Time Tracking tab from there, then click the Tasks tab.

Find the tasklist you wish to add a task to. Click ... at the end of the tasklist row and select add task.
A modal Add New Task window will pop up.
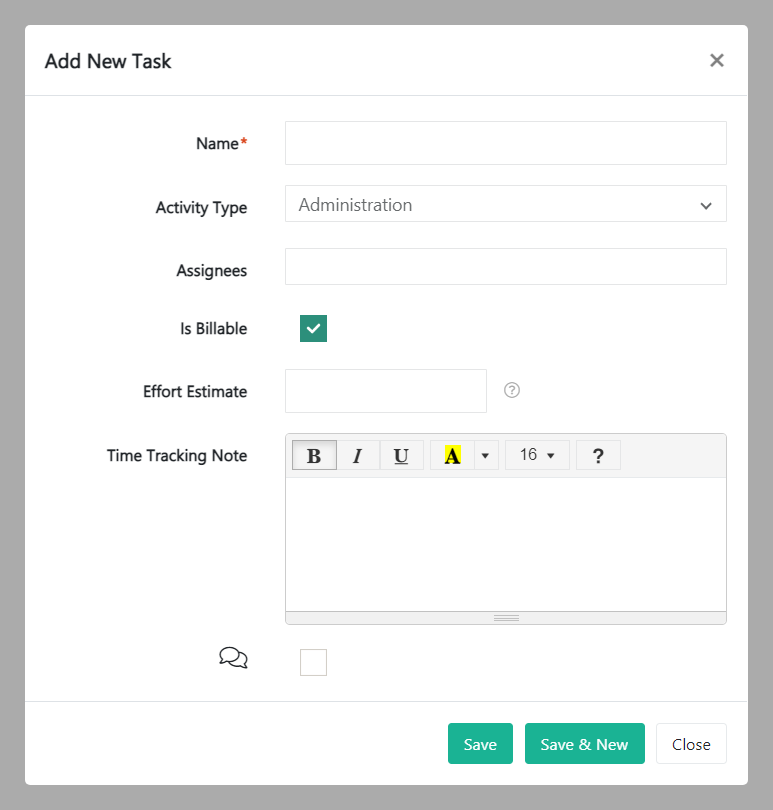
Fill out the following fields:
- Name – Give the task a name.
- Activity Type – Select the activity type from the dropdown menu. You can choose Administration, Non-productive Time, Production / Services, Sales, Support, and Uncategorized.
- Assignees – Select one or more assignees from the dropdown menu. Assignees can be defined in the Personnel module.
- Is Billable – This box is checked by default. Untick if the task is not billable.
- Effort Estimate – Enter an estimate for the duration for the task to be completed. For more information about how to use the smart Time Span Picker, move your mouse over the question mark on the right of this input field.
- Time Tracking Note – You can predefine the note that appears in time tracking for this task.
- Comment – Check this box to make comments mandatory. Comments can be viewed at the corresponding task row after expanding a task list. Hover the mouse over the comment icon to read them.
Review the information and click Save or Save & New if you want to add more tasks. Click Close to return to the Tasks view.
How to add a task from a template
To add a task from a template to the entire Checklists module, go to the Checklists module and click the Time Tracking tab. If you want to add a task from a template to a specific checklist, go inside the checklist and click the Time Tracking tab from there, then click the Tasks tab.

Click ... at the end of the selected tasklist row and select add tasks from template.
A modal Add Tasks from Template window will pop up.
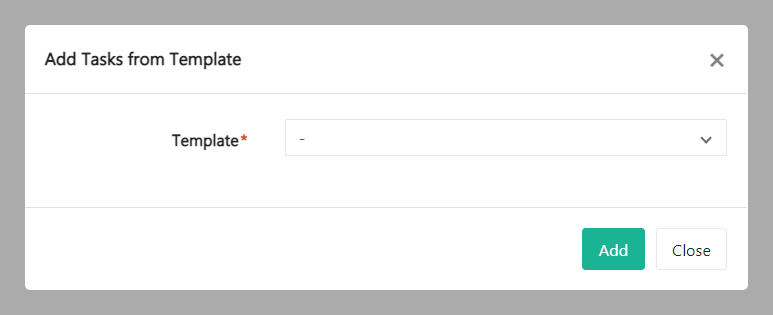
Select a template for this task from the dropdown menu and click Add. Templates are created and defined in the Organization Configuration by an administrator.
How to hide a tasklist in time tracking
To hide a tasklist in the entire Checklists module's time tracking, go to the Checklists module and click the Time Tracking tab. If you want to hide a tasklist in a specific checklist's time tracking, go inside the checklist and click the Time Tracking tab from there, then click the Tasks tab.

Find the tasklist you wish to hide in time tracking. Click ... at the end of the selected tasklist row and select hide in time tracking.
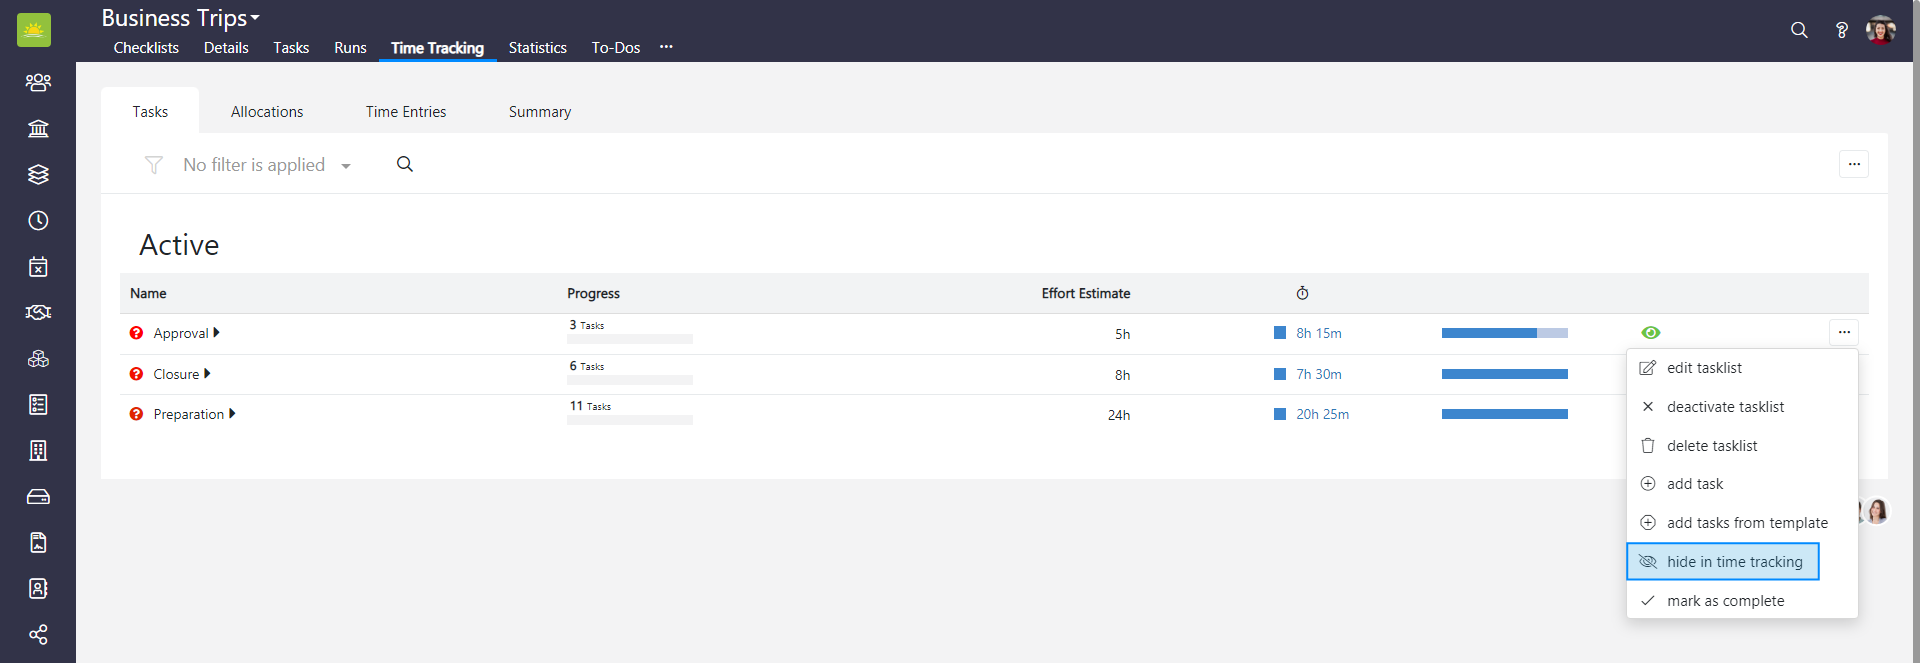
To reverse this action and show the tasklist in time tracking, repeat the previous steps and click show in time tracking.
How to mark a tasklist as complete
To mark a tasklist as complete in the entire Checklists module, go to the Checklists module and click the Time Tracking tab. If you want to mark a tasklist as complete in a specific checklist, go inside the checklist and click the Time Tracking tab from there, then click the Tasks tab.

Find the tasklist you wish to mark as complete. Click ... at the end of the selected tasklist row and click mark as complete.
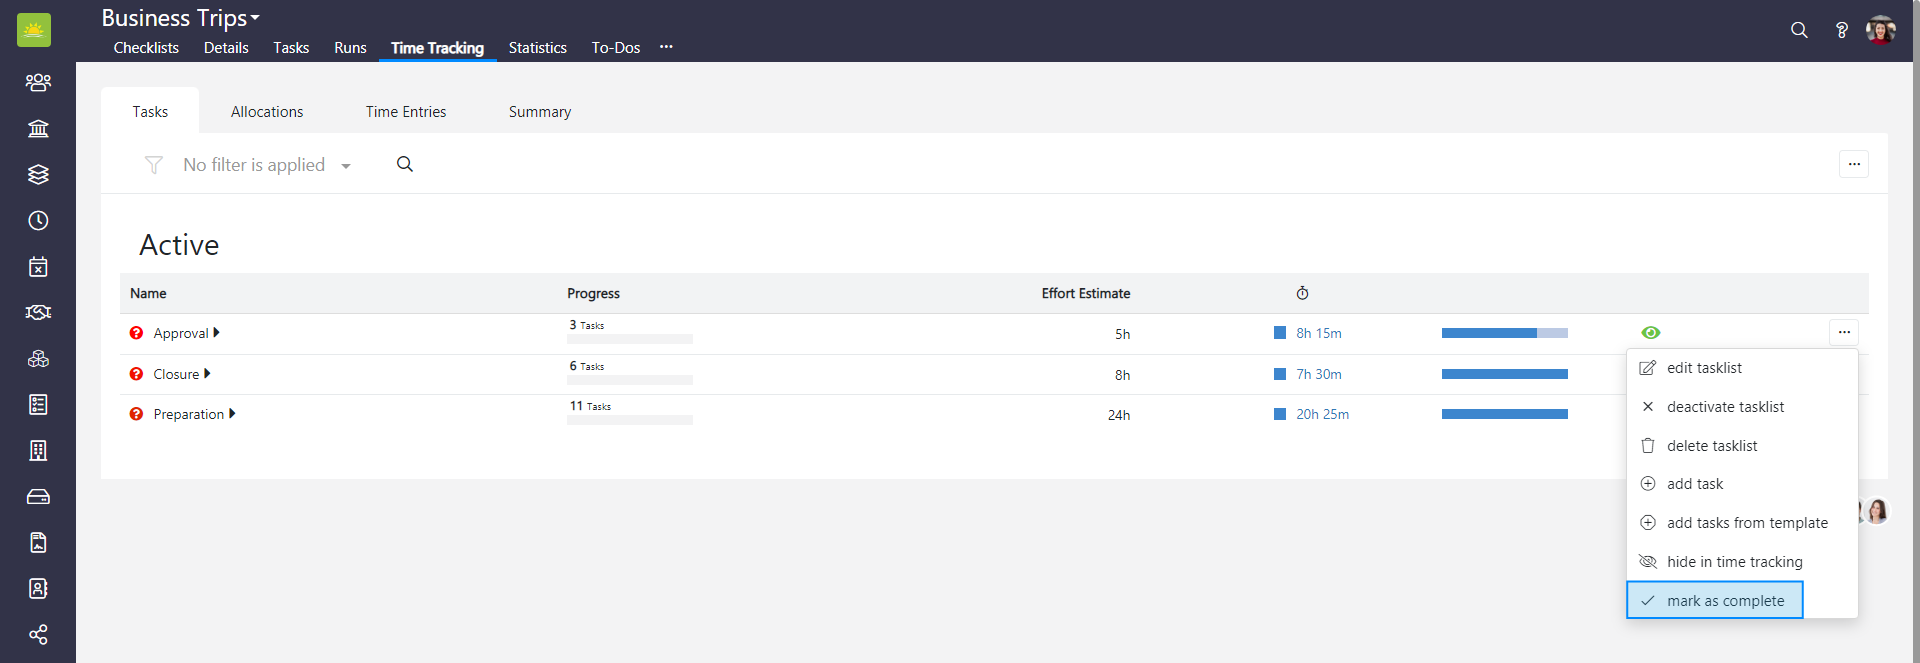
The tasklist will now appear in the Completed section of the Tasks window under the Checklist Time Tracking tab.
Note that the Completed tasklists can be edited the same way as Active tasklists. It is possible to mark a tasklist as incomplete and move it to the Active section.
How to edit a task
To edit a task in the entire Checklists module, go to the Checklists module and click the Time Tracking tab. If you want to edit a task in a specific checklist, go inside the checklist and click the Time Tracking tab from there, then click the Tasks tab.

Expand a tasklist to view tasks and find the task you want to edit. Click … at the end of the selected task row and click edit task.
An Edit Task modal window will pop up.
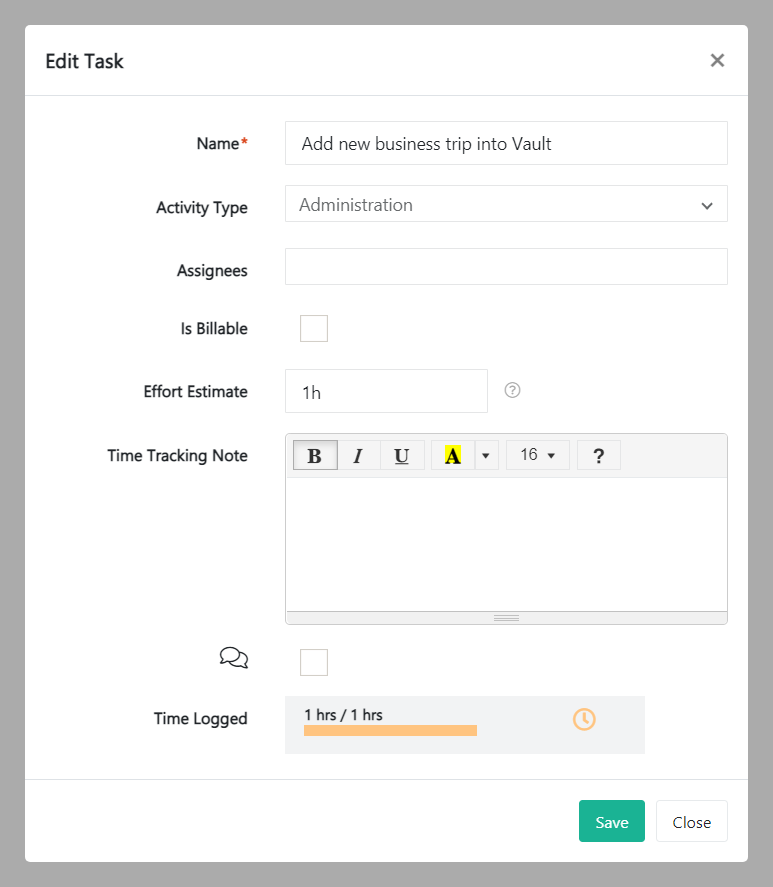
Edit the fields as required and click Save.
How to deactivate a task
To deactivate a task in the entire Checklists module, go to the Checklists module and click the Time Tracking tab. If you want to deactivate a task in a specific checklist, go inside the checklist and click the Time Tracking tab from there, then click the Tasks tab.

Expand a tasklist to view tasks and find the task you want to deactivate. Click … at the end of the selected task row and click deactivate.
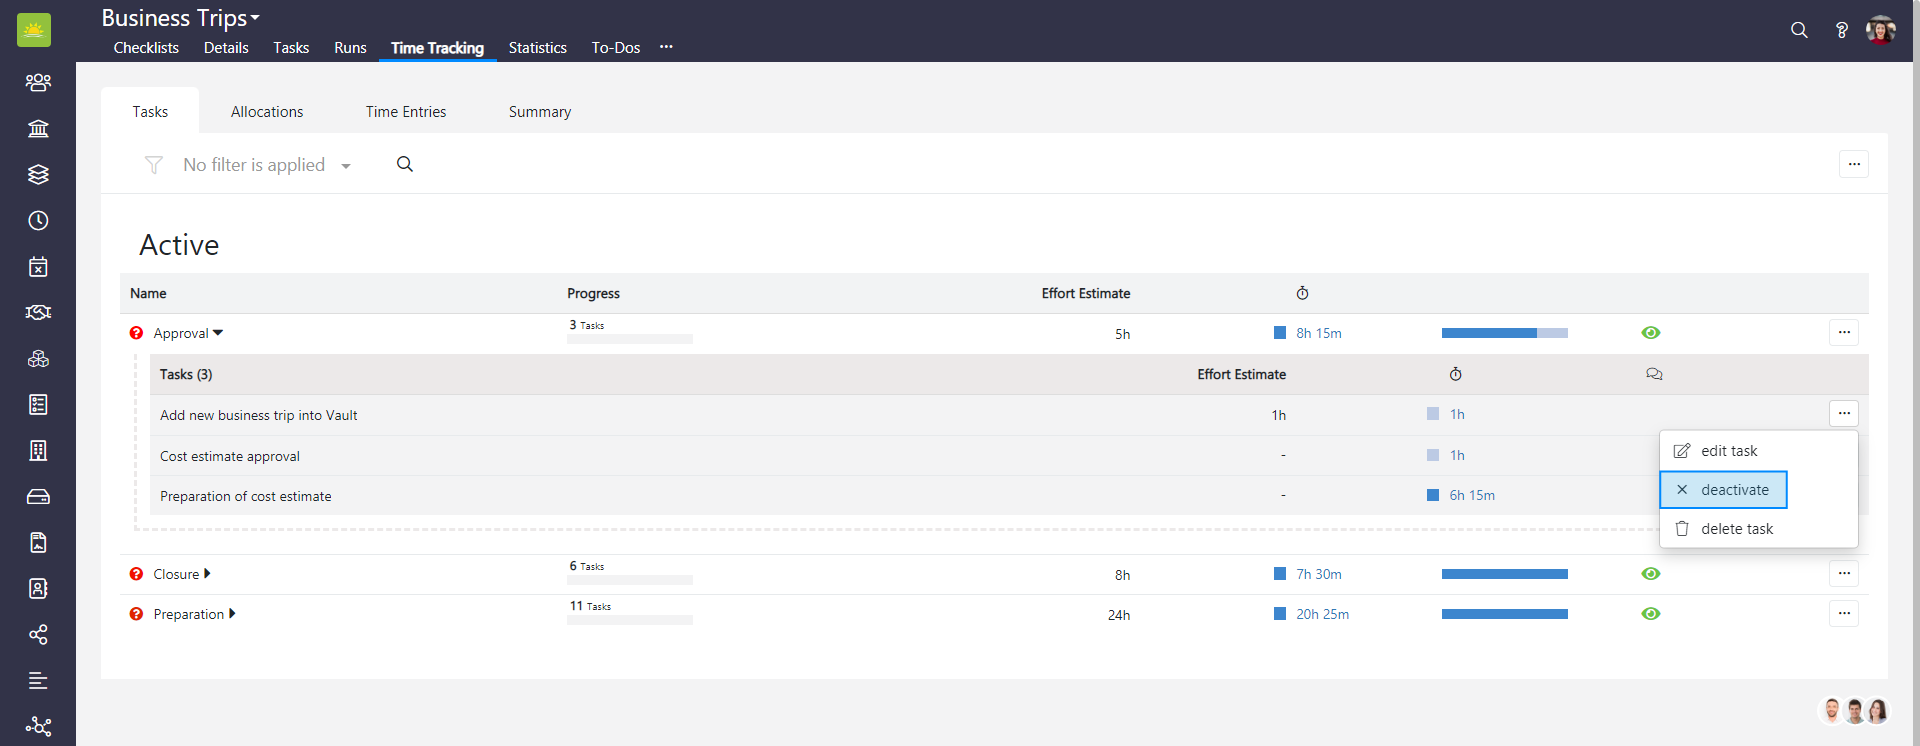
To minimize the risk of accidental deactivation, you must confirm your intention to deactivate the task. Click OK and the task will be deactivated.

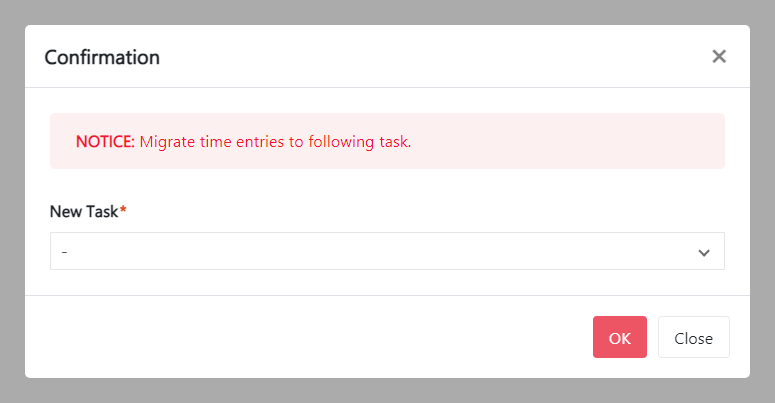
How to delete a task
To delete a task from the entire Checklists module, go to the Checklists module and click the Time Tracking tab. If you want to delete a task from a specific checklist, go inside the checklist and click the Time Tracking tab from there, then click the Tasks tab.

Expand a tasklist to view tasks and find the task you want to delete. Click … at the end of the selected task row and select delete task.
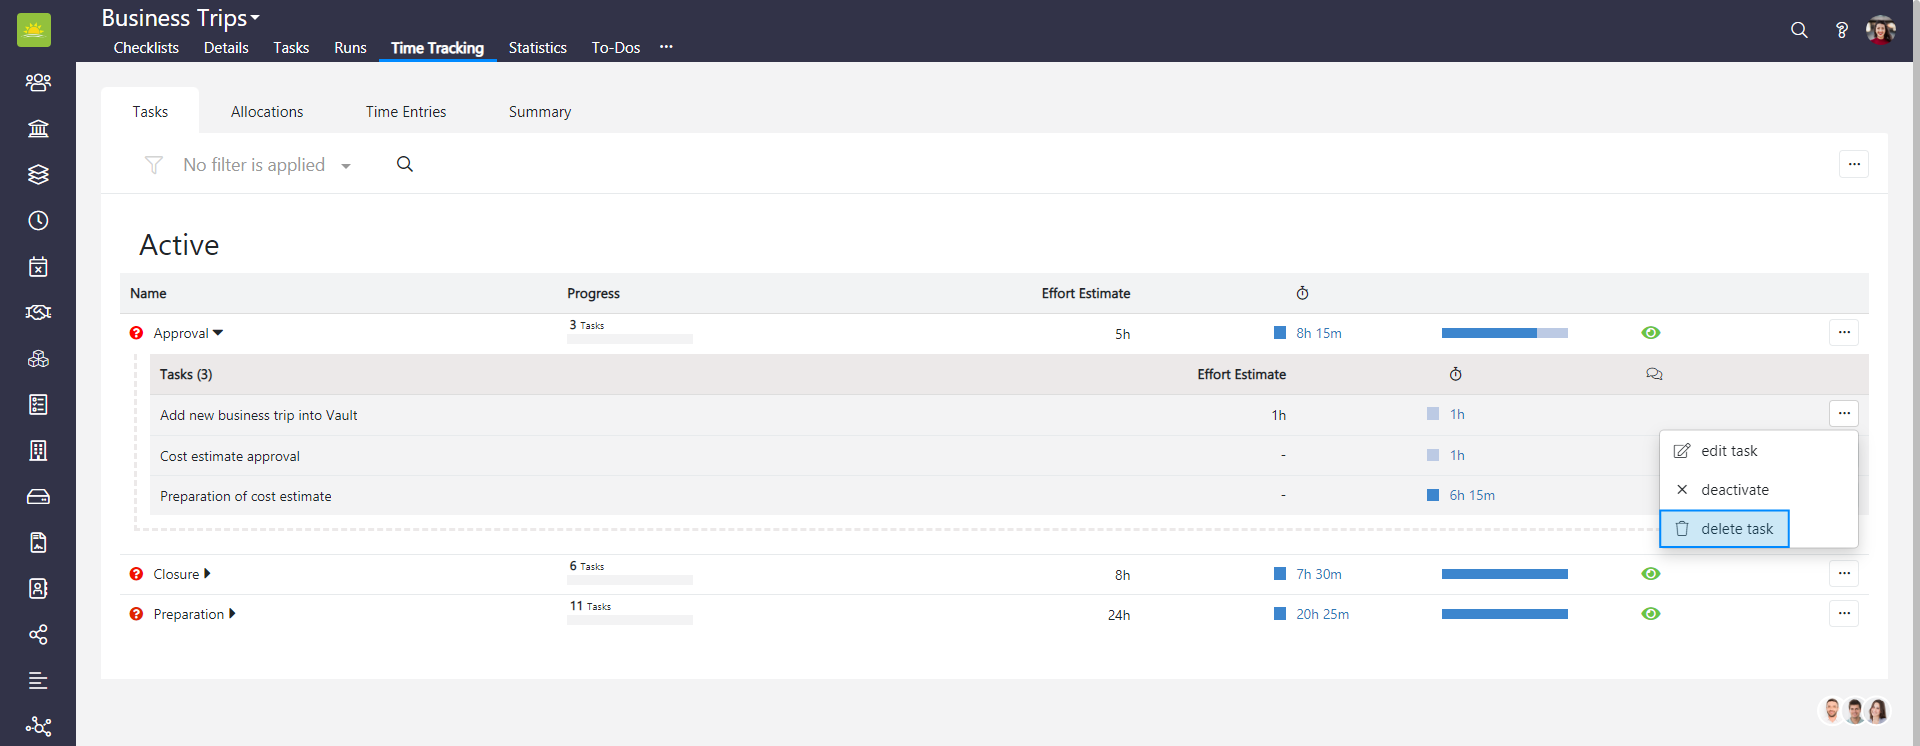
A task is synced with time entry data that you likely don’t want to lose, so you must select a different task from the dropdown list which the existing time entries will be migrated to. Click OK to delete the task.
Didn’t find what you were looking for?
Contact us and we’ll build the right solution for you. Vault Synapse can be fully customized based on your business needs.