- Knowledge Base
- Time Tracking
- Time Reports
- What are time reports
- How to add a run
- How to edit a run
- How to mark a run as complete
- How to archive a run
- How to delete a run
- How to change the assignee
- How to add a result in a checklist run
- How to add bulk results in a checklist run
- How to share run tasks with external participants
- How to generate an Excel or PDF report from a checklist run
- How to filter the run tasks view
- What is an office asset
- How to create a new asset
- How to manage an asset
- How to move an asset
- How to dispose of an asset
- How to transfer (in) an asset
- How to transfer (out) an asset
- How to log a sighting of an asset
- How to log an inspection of an asset
- How to log maintenance on an asset
- How to export a record of an asset
- How to print asset labels
- Introduction
- Admissions
- Assets
- Bank Accounts
- Boards
- Business Trips
- Candidates
- Checklists
- Clients
- Companies
- Consents
- Contacts
- Contracts
- Custom Forms
- Departments
- Documents
- Evaluations
- Employee Performance
- GL Accounts
- Incoming Center
- Integrations/External Systems
- Invoices
- Job Management
- Key Dates
- Months
- Offices
- Personnel
- Polls
- Project Management
- Project Status
- Purchase Orders
- Schedule
- Shared Spaces
- Teams
- Time Off
- Time Tracking
- Transactions
- Vendors
- Mobile Application
- What is a personnel asset
- How to create a new asset
- How to manage an asset
- How to move an asset
- How to log inspection on an asset
- How to log maintenance on an asset
- How to dispose of an asset
- How to transfer (out) an asset
- How to transfer (in) an asset
- How to log a sighting on an asset
- How to print asset labels
- How to export a record of an asset
- What is a project asset
- How to create a new asset
- How to manage an asset
- How to move an asset
- How to log inspection on an asset
- How to log maintenance on an asset
- How to dispose of an asset
- How to transfer (out) an asset
- How to transfer (in) an asset
- How to log a sighting of an asset
- How to print asset labels
- How to export a record of an asset
- Project transactions
- How to record an estimate
- How to create a budget
- How to submit transaction items for approval
- How to approve or deny budgeting items from the transactions grid
- How to create a purchase order from approved estimates
- How to link approved estimates to approved budgets
- How to cancel a transaction
- How to deactivate a transaction
- How to edit a transaction
- How to re-submit a denied transaction
What are time reports
Time reports are visual summaries of time entries that give you a detailed look at how many hours have been spent on tasks, projects, by which department, and by whom over a period. Time reports allow for cost analysis and increase transparency in billing. Apply filters to include as much or as little information you or your client need to view. Reports can be created to custom dates or for defined time units (day, week, or month) from the past or for the present.
To view the Time Reports screen, go to the Time Tracking module which is located under the  icon in the main navigation sidebar and click the Time Reports tab.
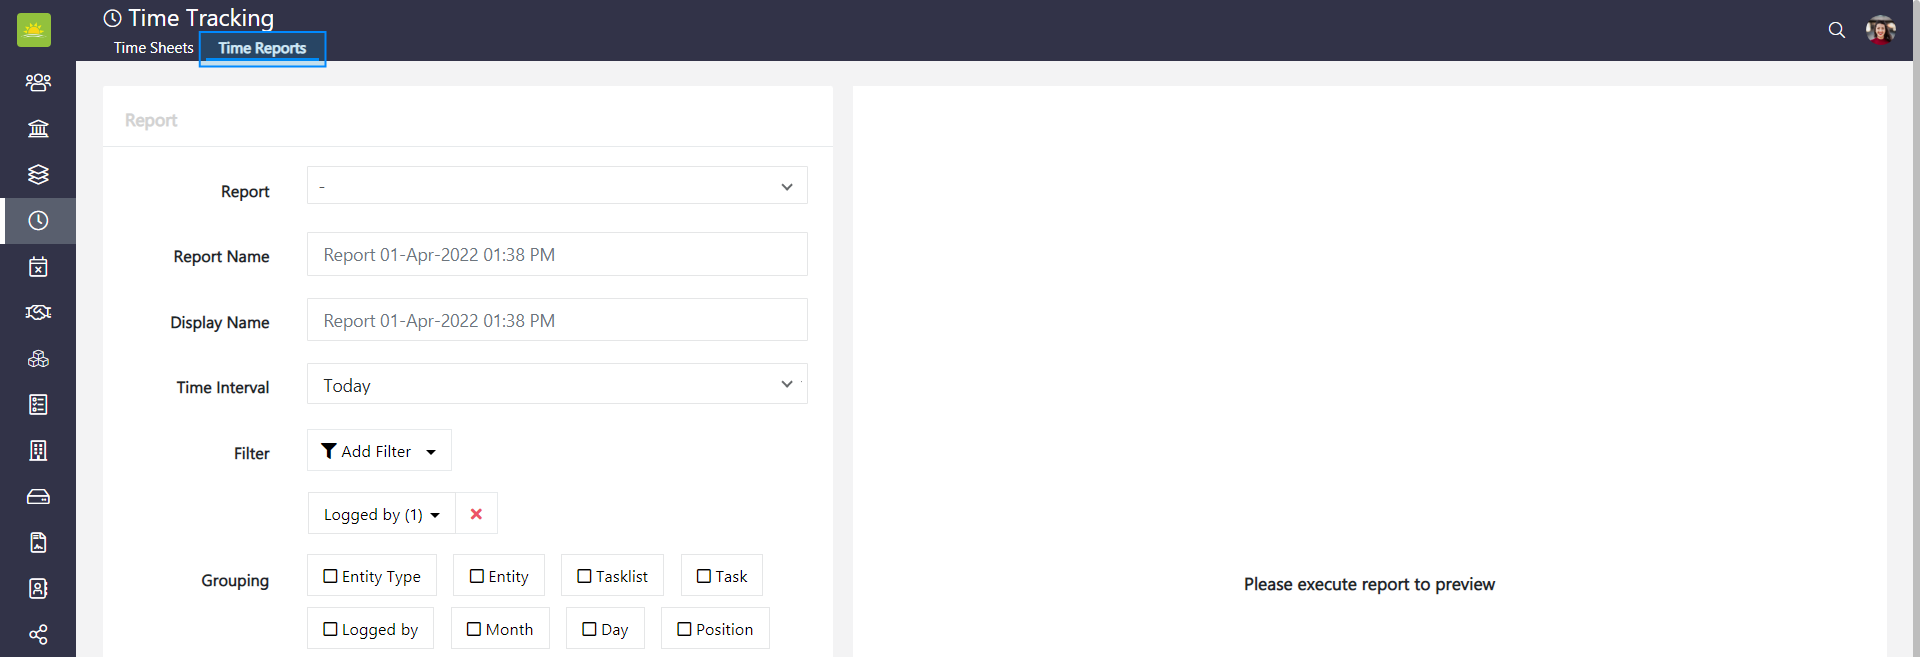
Fill out the fields about the new time report:
- Report – If you are generating a new report, click ‘new report’ from the dropdown menu. If there are any saved reports for recipients you send reports regularly to, you can select it from the dropdown menu.
- Report Name – The current day and time will be populated per default. Start typing into the field to create your own name for the report.
- Display Name – You can enter the report display name here. For example, a client’s naming convention might differ to your organization's naming convention.
- Time Interval – You have multiple options as you can choose today, yesterday, current week, previous week, current month, previous month, or custom. If you choose custom, a date picker will allow you to select a 'from' and 'to' date for the report.
- Filter – You can add multiple filters to create a customized report. The primary filter elements are all entities you can log time against like Candidate, Checklist, Client, Contract, Department, Office, Opportunity, or Project. Your primary filter selection (e.g. Client) opens a secondary filter to add all clients or check boxes to one or more clients. A third filter allows you to add all tasklists or check one or more tasklists. Tasklists can be filtered further to add all tasks or check one or more tasks for your time report. Once you select the primary filter element, you can add a “Logged by” field to all filters by typing an employee’s name into the search field or by checking one or more boxes next to personnel names in the dropdown menu.
- Grouping – You have multiple options to group the data for your report. Check the boxes you want to be displayed. Select from Entity Type, Entity, Tasklist, Task, Logged by, Month, Position, Office, Department, and Task Category. The order the grouping is displayed in the report can be changed with the drag and drop function.
- Time Zone – Select the applicable time zone for the report from the dropdown menu.
- Include time entries – Check this box if you want time entries to be included in your report.
Was this article helpful?
Didn’t find what you were looking for?
Contact us and we’ll build the right solution for you. Vault Synapse can be fully customized based on your business needs.